


In a certain way, there is also activating and strengthening the core too for that reason.
Enjoy!
By Justin Price
There are two things many of our clients have in common: They want to have nice-looking buns and, at some point in their lives, they will experience lower-back pain. The good news is that developing strong, shapely glutes can contribute to a pain-free lower back. In this article, you’ll learn why deconditioned and/or dysfunctional gluteal muscles and lower-back pain often go hand-in-hand. You’ll also learn which exercises build strong glutes and can help keep lower-back pain at bay.
What Causes Back Pain
Many people mistakenly believe that lower-back pain is caused by a problem with their lower back. This is understandable given that movements of daily life, sports and most weight-bearing exercise modalities require the spine to move forward, backward, side to side and in rotation (McGill, 2002). When you lean forward, for example, the spine rounds/flexes. When walking and running, it moves from side to side as you transfer weight from one foot to the other. When performing sporting movements like golf, tennis and baseball, the spine must rotate to achieve the desired motion (Chasan, 2002).
However, all these movements of the spine require other parts of the body to work as well. When bending forward to pick a weight up from the ground, for example, the ankles, knees and hips should also bend to help lower the torso. Similarly, as the spine moves from side to side during walking, the legs and hips should also move from side to side (i.e., adduct and abduct) to help provide a good base of support for the spine as it moves. Rotational movements of the spine should be accompanied by rotational movements in the legs and hips so the tremendous force created by swinging a tennis racket or golf club, for example, is dissipated throughout the entire body. When actions of the spine are not accompanied by correct movement in the rest of the body, the spine and its surrounding muscles (e.g., the lower back) have to take up the slack and may become overworked and injured.
How Strong Glutes Can Help Prevent Back Pain
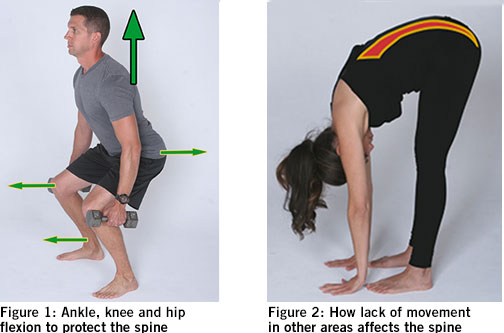
The gluteal complex of muscles (i.e., gluteus maximus, medius and minimus) plays a key role in helping take stress off the spine during multiplanar movements. That’s because these muscles help control movements of the torso, pelvis, hips and legs. When you bend forward or squat, for example, your hips should bend backward to counterbalance the forward motion of your upper body to help you stay upright (Figure 1). The gluteus maximus works to decelerate flexion of your hips to help counteract the downward pull of gravity and prevent your lumbar spine from over-rounding forward (Price and Bratcher, 2010). If your glutes are not strong enough to fully engage when your hips bend backward, your spine must round forward excessively to lower your arms to the ground (Figure 2).
How to Build Strong Glutes and a Pain-free Lower Back
As you have seen, correct functioning of the gluteal complex of muscles can help protect the structures of the lumbar spine as it moves during multiple planes of motion. However, before you begin overloading these muscles in an attempt to build strong glutes and a pain-free back, it is extremely important to adequately prepare them so as not to injure your lower back (Price and Bratcher, 2010). The following “warm up and wake up” series of self-myofascial release exercises and neuromuscular activation techniques will help ensure your gluteal muscles are working correctly and can protect your lower back as you move through various ranges of motion in the glute-strengthening program that follows.
Warm-up Exercises
For gluteal muscles to be flexible enough to lengthen effectively and decelerate movements of the pelvis, hips and spine, have your clients perform some self-myofascial release techniques on the muscles of the glutes and lower back prior to exercising. This will ensure the tissues are warm and mobile and can move in all three planes of motion.
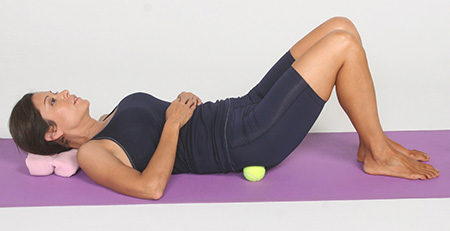
Tennis Ball on the Butt
Massaging the gluteal complex of muscles before working out can help promote better movement of the pelvis, hips and legs, and ensure you get the most out of the strengthening exercises that follow.
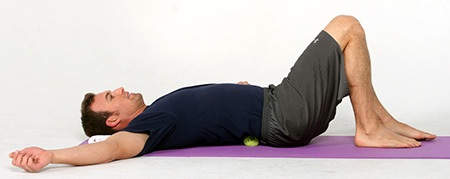
Have your client to lie on his or her back with the knees bent. Place a tennis ball under the right side of the butt and scoot the body up and down and from side to side to move the ball to any sore spots, from the base of the spine all the way out to the side of the leg. You can progress this exercise by coaching your client to place the right ankle on the left knee. Place a rolled-up towel under the left hip to help keep the pelvis level. Roll out each buttock for one to two minutes. While a tennis ball is the easiest piece of equipment to purchase and use, a foam roller can also be used to massage the gluteal complex.
Tennis Ball on Lower Back
The gluteus maximus muscle ties into the fascia of the lower back (i.e., thoracolumbar fascia). Therefore, massaging the muscles on either side of the lumbar spine is important before performing glute-strengthening exercises.
Instruct your client to lie on his or her back with the knees bent. Place a tennis ball under the right side of the lower back (away from the spine itself) and scoot the body to move the ball to any sore spots between the bottom of the rib cage and the top of the hip. (Note: Do not place the tennis ball directly under the bottom two ribs. These are “floating ribs,” which do not attach to the sternum at the front of the rib cage.) Massage the area on each side of the spine for one to two minutes.
Foam Roller on Side of Thigh
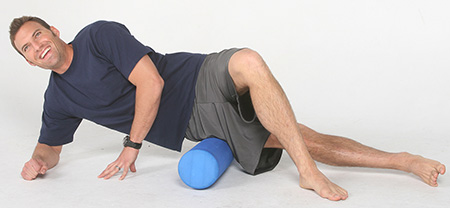
The iliotibial band on the side of the thigh attaches the gluteus maximus muscle to the lower leg. Increasing blood supply to this structure will encourage correct movement of the hip and leg.
Instruct your client to place a foam roller beneath and perpendicular to the right leg, which is extended, and to balance the body on the right elbow and the left foot. Roll the leg up and down over the roller and pause on any sore spots. If your client has shoulder problems, or finds it difficult to balance, instruct him or her to lie on the ground with the head supported by a pillow, and place a tennis ball under the outside of the thigh. Perform this exercise for one to two minutes on each side.
Wake-up Exercises
People with lower-back problems typically have difficulty activating their glutes correctly. The following isometric and/or single-joint neuromuscular-activation exercises for the gluteus maximus, minimus and medius ensure these muscles are receiving correct input from the nervous system before you load them up with dynamic, multiplanar strengthening exercises.
The Duck Stand
The gluteus maximus muscle can lose neural input and become dysfunctional in people who have chronic lower-back pain. This isometric activation exercise helps “wake up” the gluteus maximus muscle by reestablishing a better connection with the nerves that supply it.
Instruct your client to stand with the feet hip-width apart and toes turned outward like a duck. Tuck the pelvis under (i.e., posteriorly rotate) and try to rotate the legs outward without moving the feet. As the legs rotate outward, the ankles roll out slightly, the arches of the feet rise up, and the glute muscles on either side contract. Stand erect with good posture and hold each repetition for 10 to 15 seconds. Perform three to four sets. Teach your client to pay attention to the sensation he or she feels on each side specifically and notice if both sides are working correctly. If one side is not working as well as the other, instruct the client to perform the “Glute Activation Over Ball” exercise that follows.
Glute Activation Over Ball
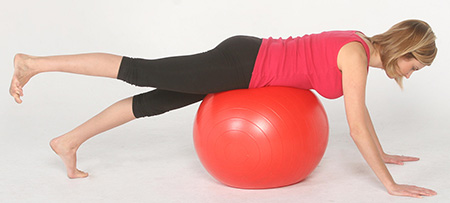
This neuromuscular activation exercise highlights and remedies deficiencies in one or both sides of the gluteus maximus muscle.
Instruct your client to lie prone over a gym ball using the hands to balance. Posteriorly rotate the pelvis (i.e., tuck under) and turn the right foot out slightly while lifting the right leg. Make sure to keep the hips level and square and the pelvis posteriorly rotated. It is also extremely important to not arch the lower back while lifting the leg. To help enhance activation of the gluteus maximus muscle, try different foot positions (i.e., turn the foot out more, keep it straight, turn it in slightly) while the leg is raised. Complete eight to 10 repetitions on each side, performing more sets on the side where the glute is most deficient. After completing this exercise, repeat the “Duck Stand” exercise shown above and ask your client if he or she now feels more activation of their gluteus maximus muscle.

Side-lying Leg Lift
The gluteus medius and minimus muscles need to be working effectively to help control side-to-side movements of the pelvis and provide a good base of support for the spine. Help your client “wake up” these muscles with this simple activation technique before performing the more dynamic glute exercises that follow.
Instruct your client to lie on his or her side with the head supported by pillow. Bend the knee of the right leg and place the instep of that foot just below the left knee. Gently raise and lower the right knee while keeping the pelvis tucked under and stationary throughout the exercise. Don’t “cheat” during this exercise by hiking the hip, arching the lower back or rolling the hips. When performing this exercise correctly, your client will feel a strong contraction on the outside of the right butt and hip. Complete eight to 10 repetitions on each side, focusing more on the side that is the weakest.
Gluteal-strengthening Exercises
Once the gluteal muscles are warm and awake, progress to the gluteal-strengthening exercises detailed below. These exercises are designed to strengthen the muscles in a lengthening fashion (i.e., eccentrically) to produce strong, healthy glutes that can protect the lower back from injury.
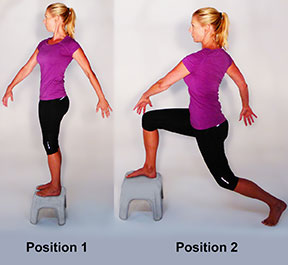
Reverse Step-lunge With Rotation
This exercise targets the gluteus maximus muscle. Lunging backward off a step requires the hip of the front leg to flex more and the gluteus maximus muscle of that leg to work harder to decelerate the movement. Rotating the torso over the front leg also promotes better activation of the gluteus maximus during this exercise.
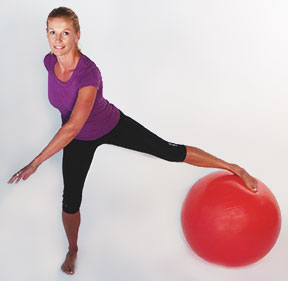
The “Ice Skater”
This exercise is designed to strengthen the gluteus maximus, medius and minimus muscles to provide a good base of support for the torso and prevent excessive side-to-side movement of the lumbar spine.
Instruct your client to place one foot on a small gym ball while balancing most of his or her weight on the right leg. Roll the gym ball out to the left side with the left foot while performing a single-leg squat with the right leg. Rotate the arms over the right leg while keeping the spine erect and shoulders level, and keep the knee of the right leg toward the midline of the body. If this is difficult, the client may need to regress back to doing more self-myofascial release exercises to help release tension from the glutes (see above). Perform two to three sets of 10 to 15 repetitions on each side.
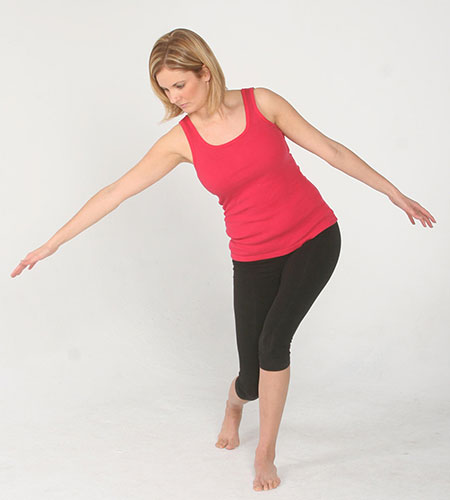
Side Lunge With Reach
This exercise, while also strengthening the gluteus maximus muscle, focuses on strengthening the gluteus minimus and medius muscles.
Instruct your client to take a lunge stance with the left leg forward and reach the right arm away from the body while shifting the hips toward the left. The shoulders should tip down to the right as the hips move toward the left to counterbalance the torso. The left knee and ankle should rotate in the direction of the midline. Return to a standing upright position and repeat. Perform two to three sets of 10 to 15 repetitions on each side.
Enjoy!
By Justin Price
There are two things many of our clients have in common: They want to have nice-looking buns and, at some point in their lives, they will experience lower-back pain. The good news is that developing strong, shapely glutes can contribute to a pain-free lower back. In this article, you’ll learn why deconditioned and/or dysfunctional gluteal muscles and lower-back pain often go hand-in-hand. You’ll also learn which exercises build strong glutes and can help keep lower-back pain at bay.
What Causes Back Pain
Many people mistakenly believe that lower-back pain is caused by a problem with their lower back. This is understandable given that movements of daily life, sports and most weight-bearing exercise modalities require the spine to move forward, backward, side to side and in rotation (McGill, 2002). When you lean forward, for example, the spine rounds/flexes. When walking and running, it moves from side to side as you transfer weight from one foot to the other. When performing sporting movements like golf, tennis and baseball, the spine must rotate to achieve the desired motion (Chasan, 2002).
However, all these movements of the spine require other parts of the body to work as well. When bending forward to pick a weight up from the ground, for example, the ankles, knees and hips should also bend to help lower the torso. Similarly, as the spine moves from side to side during walking, the legs and hips should also move from side to side (i.e., adduct and abduct) to help provide a good base of support for the spine as it moves. Rotational movements of the spine should be accompanied by rotational movements in the legs and hips so the tremendous force created by swinging a tennis racket or golf club, for example, is dissipated throughout the entire body. When actions of the spine are not accompanied by correct movement in the rest of the body, the spine and its surrounding muscles (e.g., the lower back) have to take up the slack and may become overworked and injured.
How Strong Glutes Can Help Prevent Back Pain
The gluteal complex of muscles (i.e., gluteus maximus, medius and minimus) plays a key role in helping take stress off the spine during multiplanar movements. That’s because these muscles help control movements of the torso, pelvis, hips and legs. When you bend forward or squat, for example, your hips should bend backward to counterbalance the forward motion of your upper body to help you stay upright (Figure 1). The gluteus maximus works to decelerate flexion of your hips to help counteract the downward pull of gravity and prevent your lumbar spine from over-rounding forward (Price and Bratcher, 2010). If your glutes are not strong enough to fully engage when your hips bend backward, your spine must round forward excessively to lower your arms to the ground (Figure 2).
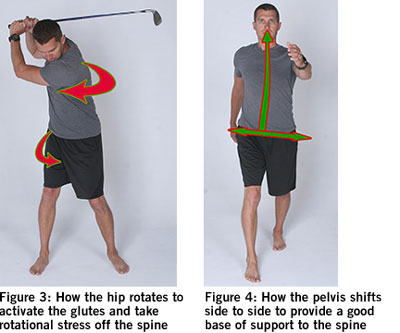
Similarly, much of the rotational movement stress experienced by the spine during sporting activities is moderated by the gluteus maximus muscle. When the spine rotates over the leg on one side of the body (e.g., when taking a backswing or follow through in golf, tennis or baseball), the hip and leg should also rotate to take stress off the lower back (Figure 3). Because the gluteus maximus muscle attaches to the structures of spine and pelvis and to the leg, rotation of the hip and leg should engage and lengthen this muscle, thus helping to decelerate rotation of the torso (Golding and Golding, 2003). If the gluteus maximus muscle is not working properly, stress from rotational movements is instead transferred to the lumbar spine and may manifest as pain in the lower back.
Side-to-side movement stress to the spine is moderated by the smaller muscles of the gluteal complex—the gluteus medius and minimus (Dimon and Qualter, 2008). As the spine moves from left to right as a person takes alternating steps when walking and running, the pelvis should also move from side to side (Figure 4). This shifting motion of the pelvis with the torso is decelerated by the gluteus medius and minimus because of their attachments from the pelvis to the side of the hip and leg. When they are healthy and functional they act as a brake for the lumbar spine, protecting it from excessive movement and stress. If they are not working correctly, pain may manifest in the hips and lower back. How to Build Strong Glutes and a Pain-free Lower Back
As you have seen, correct functioning of the gluteal complex of muscles can help protect the structures of the lumbar spine as it moves during multiple planes of motion. However, before you begin overloading these muscles in an attempt to build strong glutes and a pain-free back, it is extremely important to adequately prepare them so as not to injure your lower back (Price and Bratcher, 2010). The following “warm up and wake up” series of self-myofascial release exercises and neuromuscular activation techniques will help ensure your gluteal muscles are working correctly and can protect your lower back as you move through various ranges of motion in the glute-strengthening program that follows.
Warm-up Exercises
For gluteal muscles to be flexible enough to lengthen effectively and decelerate movements of the pelvis, hips and spine, have your clients perform some self-myofascial release techniques on the muscles of the glutes and lower back prior to exercising. This will ensure the tissues are warm and mobile and can move in all three planes of motion.
Tennis Ball on the Butt
Massaging the gluteal complex of muscles before working out can help promote better movement of the pelvis, hips and legs, and ensure you get the most out of the strengthening exercises that follow.
Have your client to lie on his or her back with the knees bent. Place a tennis ball under the right side of the butt and scoot the body up and down and from side to side to move the ball to any sore spots, from the base of the spine all the way out to the side of the leg. You can progress this exercise by coaching your client to place the right ankle on the left knee. Place a rolled-up towel under the left hip to help keep the pelvis level. Roll out each buttock for one to two minutes. While a tennis ball is the easiest piece of equipment to purchase and use, a foam roller can also be used to massage the gluteal complex.
Tennis Ball on Lower Back
The gluteus maximus muscle ties into the fascia of the lower back (i.e., thoracolumbar fascia). Therefore, massaging the muscles on either side of the lumbar spine is important before performing glute-strengthening exercises.
Instruct your client to lie on his or her back with the knees bent. Place a tennis ball under the right side of the lower back (away from the spine itself) and scoot the body to move the ball to any sore spots between the bottom of the rib cage and the top of the hip. (Note: Do not place the tennis ball directly under the bottom two ribs. These are “floating ribs,” which do not attach to the sternum at the front of the rib cage.) Massage the area on each side of the spine for one to two minutes.
Foam Roller on Side of Thigh
The iliotibial band on the side of the thigh attaches the gluteus maximus muscle to the lower leg. Increasing blood supply to this structure will encourage correct movement of the hip and leg.
Instruct your client to place a foam roller beneath and perpendicular to the right leg, which is extended, and to balance the body on the right elbow and the left foot. Roll the leg up and down over the roller and pause on any sore spots. If your client has shoulder problems, or finds it difficult to balance, instruct him or her to lie on the ground with the head supported by a pillow, and place a tennis ball under the outside of the thigh. Perform this exercise for one to two minutes on each side.
Wake-up Exercises
People with lower-back problems typically have difficulty activating their glutes correctly. The following isometric and/or single-joint neuromuscular-activation exercises for the gluteus maximus, minimus and medius ensure these muscles are receiving correct input from the nervous system before you load them up with dynamic, multiplanar strengthening exercises.
The Duck Stand
The gluteus maximus muscle can lose neural input and become dysfunctional in people who have chronic lower-back pain. This isometric activation exercise helps “wake up” the gluteus maximus muscle by reestablishing a better connection with the nerves that supply it.
Instruct your client to stand with the feet hip-width apart and toes turned outward like a duck. Tuck the pelvis under (i.e., posteriorly rotate) and try to rotate the legs outward without moving the feet. As the legs rotate outward, the ankles roll out slightly, the arches of the feet rise up, and the glute muscles on either side contract. Stand erect with good posture and hold each repetition for 10 to 15 seconds. Perform three to four sets. Teach your client to pay attention to the sensation he or she feels on each side specifically and notice if both sides are working correctly. If one side is not working as well as the other, instruct the client to perform the “Glute Activation Over Ball” exercise that follows.
Glute Activation Over Ball
This neuromuscular activation exercise highlights and remedies deficiencies in one or both sides of the gluteus maximus muscle.
Instruct your client to lie prone over a gym ball using the hands to balance. Posteriorly rotate the pelvis (i.e., tuck under) and turn the right foot out slightly while lifting the right leg. Make sure to keep the hips level and square and the pelvis posteriorly rotated. It is also extremely important to not arch the lower back while lifting the leg. To help enhance activation of the gluteus maximus muscle, try different foot positions (i.e., turn the foot out more, keep it straight, turn it in slightly) while the leg is raised. Complete eight to 10 repetitions on each side, performing more sets on the side where the glute is most deficient. After completing this exercise, repeat the “Duck Stand” exercise shown above and ask your client if he or she now feels more activation of their gluteus maximus muscle.
Side-lying Leg Lift
The gluteus medius and minimus muscles need to be working effectively to help control side-to-side movements of the pelvis and provide a good base of support for the spine. Help your client “wake up” these muscles with this simple activation technique before performing the more dynamic glute exercises that follow.
Instruct your client to lie on his or her side with the head supported by pillow. Bend the knee of the right leg and place the instep of that foot just below the left knee. Gently raise and lower the right knee while keeping the pelvis tucked under and stationary throughout the exercise. Don’t “cheat” during this exercise by hiking the hip, arching the lower back or rolling the hips. When performing this exercise correctly, your client will feel a strong contraction on the outside of the right butt and hip. Complete eight to 10 repetitions on each side, focusing more on the side that is the weakest.
Gluteal-strengthening Exercises
Once the gluteal muscles are warm and awake, progress to the gluteal-strengthening exercises detailed below. These exercises are designed to strengthen the muscles in a lengthening fashion (i.e., eccentrically) to produce strong, healthy glutes that can protect the lower back from injury.
Reverse Step-lunge With Rotation
This exercise targets the gluteus maximus muscle. Lunging backward off a step requires the hip of the front leg to flex more and the gluteus maximus muscle of that leg to work harder to decelerate the movement. Rotating the torso over the front leg also promotes better activation of the gluteus maximus during this exercise.
Instruct your client to lunge backward off a small step while rotating the arms across the right leg. Keep the spine erect and shoulders level; push the big toe of the right foot into the step to help keep the right knee toward the midline of the body. Step back up onto the step and swing the arms across the left leg. Perform 10 to 15 repetitions on each side for two to three sets.
The “Ice Skater”
This exercise is designed to strengthen the gluteus maximus, medius and minimus muscles to provide a good base of support for the torso and prevent excessive side-to-side movement of the lumbar spine.
Instruct your client to place one foot on a small gym ball while balancing most of his or her weight on the right leg. Roll the gym ball out to the left side with the left foot while performing a single-leg squat with the right leg. Rotate the arms over the right leg while keeping the spine erect and shoulders level, and keep the knee of the right leg toward the midline of the body. If this is difficult, the client may need to regress back to doing more self-myofascial release exercises to help release tension from the glutes (see above). Perform two to three sets of 10 to 15 repetitions on each side.
Side Lunge With Reach
This exercise, while also strengthening the gluteus maximus muscle, focuses on strengthening the gluteus minimus and medius muscles.
Instruct your client to take a lunge stance with the left leg forward and reach the right arm away from the body while shifting the hips toward the left. The shoulders should tip down to the right as the hips move toward the left to counterbalance the torso. The left knee and ankle should rotate in the direction of the midline. Return to a standing upright position and repeat. Perform two to three sets of 10 to 15 repetitions on each side.


 By Pete McCall, MS
 By Shannon Fable


